
Biometric Authentication Integration
Integration Guides API v2
Use this guide when your workflow runs Biometric Authentication, to compare a client's live selfie against a previously verified identity.
Biometric Authentication is typically used for returning clients. A newly captured selfie is compared against an identity established during an earlier identity verification workflow.
This guide extends API v2 integration.
Before you begin
Make sure you have:
- API credentials for sandbox and production.
- A Biometric Authentication workflow configured (for example
BiometricsOnly). - Handling for workflow statuses and Identity Verification product statuses.
- Optional: Webhooks.
Biometric Authentication results are reported under the IdentityVerification product. A workflow status of completed indicates that processing has finished, not that the biometric comparison succeeded. To determine the outcome, inspect the product status.
Returning clients
Biometric Authentication usually requires an existing Fourthline identity.
When the client previously completed Identity Verification with Fourthline, pass the existing clientId during workflow creation.
If the client was not onboarded via Fourthline but you already have a verified selfie on file, you can upload it as a referenceSelfieImage. Fourthline will use this as the reference identity for the biometric comparison instead of a previously verified Fourthline case.
Use partnerClientId only when your configuration supports creating or linking a client during the Biometric Authentication workflow.
Minimum viable integration
| Step | Operation |
|---|---|
| 1 | create-access-token-v2 |
| 2 | create-workflow-v2 |
| 3 | Upload capture data |
| 4 | create-sdk-session (SDK only) |
| 5 | start-workflow |
| 6 | get-workflow-status |
| 7 | get-workflow-report |
API-only flow
- Create workflow
- Upload required files
- Start workflow
- Monitor workflow status
- Retrieve reports
SDK flow
- Create workflow
- Create SDK session
- Complete capture in the SDK
- Start workflow
- Monitor workflow status
- Retrieve reports
Optional: replace polling with webhooks. After each webhook event, call Get workflow status to retrieve the latest workflow state.
1. Create workflow
Call Create workflow.
Returning client
{
  "workflow": "BiometricsOnly",
  "clientId": "fourthline-client-uuid"
}
New or linked client
{
  "workflow": "BiometricsOnly",
  "partnerClientId": "your-partner-client-id"
}
Requirements
- Set
workflowto your workflow name - Provide either
clientIdorpartnerClientId - Do not provide both
- Store
workflowIdandclientIdfrom the response
API reference: Create workflow
2. Choose how capture is provided
| Approach | When to use | What you implement |
|---|---|---|
| API-only | You control capture in your application | Upload files directly through the API |
| Mobile SDK | Fourthline hosts capture on mobile | Create SDK session with target: Mobile |
| Web SDK | Fourthline hosts capture in the browser | Create SDK session with target: Web |
See:
3. Required uploads (API-only)
Skip this section when capture is performed through the Mobile SDK or Web SDK.
Required uploads depend on your configuration.
The most common Biometric Authentication configuration requires:
| Upload | Document type | Purpose |
|---|---|---|
| Live selfie | SelfieImage | Compare the client against a previously verified identity |
| Existing identity | Existing clientId | Provides the reference identity for comparison |
Some configurations may require additional metadata or reference information.
Upload files using Upload client document.
Do not call Start workflow until all required files and metadata have been uploaded.
4. SDK integration
After creating the workflow:
- Call Create SDK session
- Provide:
workflowIdtarget(MobileorWeb)
- Pass the returned
validationCodefrom your backend to the SDK - Let the client complete capture
- Start the workflow
- Monitor workflow status
API reference: Create SDK session
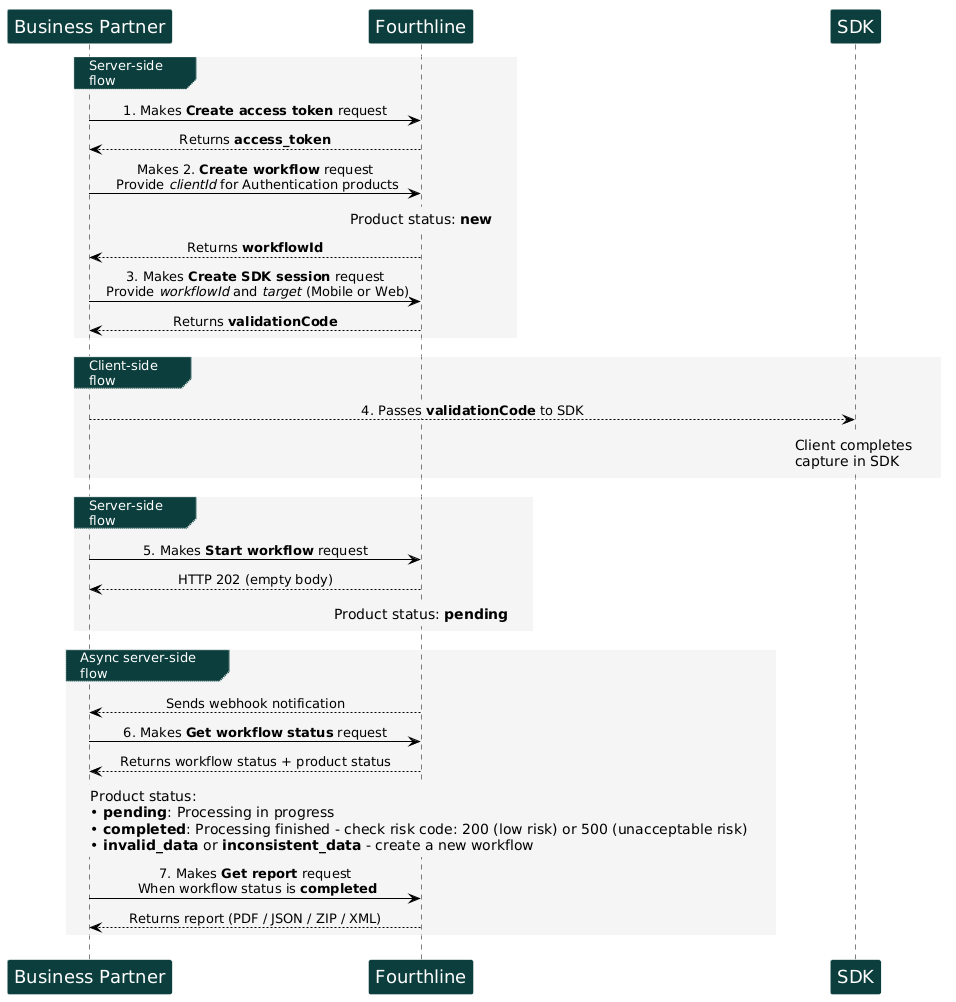
Biometric Authentication SDK flow
5. Monitor status
Use the same two-layer status model as Workflows integration.
| Layer | Field | Values |
|---|---|---|
| Workflow | workflowStatus | new, pending, completed, failed, timed_out |
| Product | products[].status where name is IdentityVerification | Identity Verification product statuses |
Webhooks
Webhook events contain details.status but do not contain workflowStatus.
After receiving a webhook:
- Call Get workflow status
- Retrieve the latest workflow state
- Check the Identity Verification product status
6. Retrieve reports
After the workflow reaches completed:
| Need | Endpoint |
|---|---|
| JSON report | Get JSON report |
| ZIP report | Get ZIP report |
| PDF report | Get PDF report |
| XML report | Get XML report |
Get workflow status returns products\[].status while the JSON report returns products\[].productStatus. Use the appropriate field for the endpoint you are calling. See Workflow reports.
API-only integration
After creating the workflow and uploading required files:
- Call Start workflow
- Expect HTTP
202with an empty response body - Poll Get workflow status
- Retrieve reports when processing completes
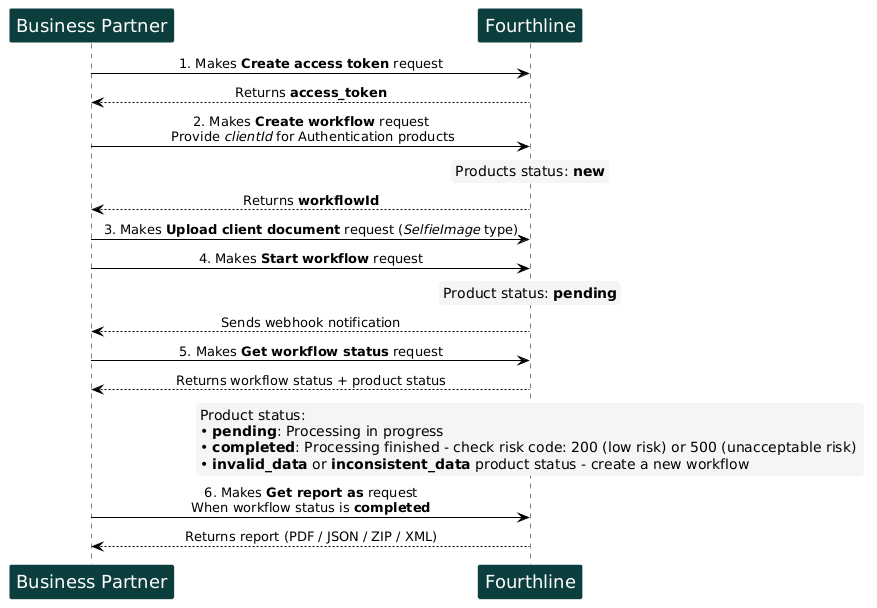
Biometric Authentication API flow
For authentication, workflow creation, and reporting concepts, see API v2 integration.
Handle common errors
| Symptom | Likely cause | What to do |
|---|---|---|
HTTP 422 on Create workflow | Invalid workflow name or client reference | Verify the workflow name and confirm the client reference |
HTTP 400 on Start workflow | Missing required uploads or workflow already started | Check workflow status and upload any missing files |
invalid_data product status | Missing or invalid metadata | Correct the data and create a new workflow if required |
Selfie mismatch status (3105, etc.) | Selfie does not match the reference identity | Create a new workflow and collect a fresh selfie. Biometric comparisons cannot be retried within the same workflow |
For additional scenarios, see API v2 integration — Handle common errors.
Support
For questions about your workflow configuration or signing setup, contact your Fourthline delivery manager.
Updated 1 day ago