
Qualified Electronic Signature Integration
Integration Guides API v2
Use this guide to integrate Qualified Electronic Signature (QES) into an API v2 workflow.
Before you begin
This guide extends the API v2 integration. Complete steps 1–5 of that guide before continuing.
Make sure you also have:
- A workflow configured with QES
- The correct
workflowvalue for Create workflow - Handling for QES product statuses
We recommend that you:
- Configure webhooks to receive status updates
- Use Get workflow status to retrieve the latest workflow state
Choose a QES workflow
Choose the workflow based on whether the client has already completed Identity Verification.
-
QES-only
Use QES-only when the client has already completed Identity Verification.
When you create the workflow, pass the existing
clientId.If Identity Verification has not been completed for that client,
Signatures.statuscan becomekyc_required. In that case, create an Identity Verification workflow for the sameclientId, then retry QES-only. Alternatively, use a QES with Identity Verification workflow. -
QES with Identity Verification
Use QES with Identity Verification when the client needs to verify their identity and sign documents in the same workflow.
When you create the workflow, pass
partnerClientIdorclientId.
Choose an integration type
You can implement the client-facing signing experience with a Fourthline SDK or build it yourself using the API.
| Integration | Use when |
|---|---|
| SDK | You want Fourthline to handle consent and the signing UI, including OTP when applicable |
| API-only | You want your application to handle the signing UI and signing requests |
For SDK integrations, use:
- Fourthline Mobile SDK
- Fourthline Web SDK
The remainder of this guide describes the API-only signing flow.
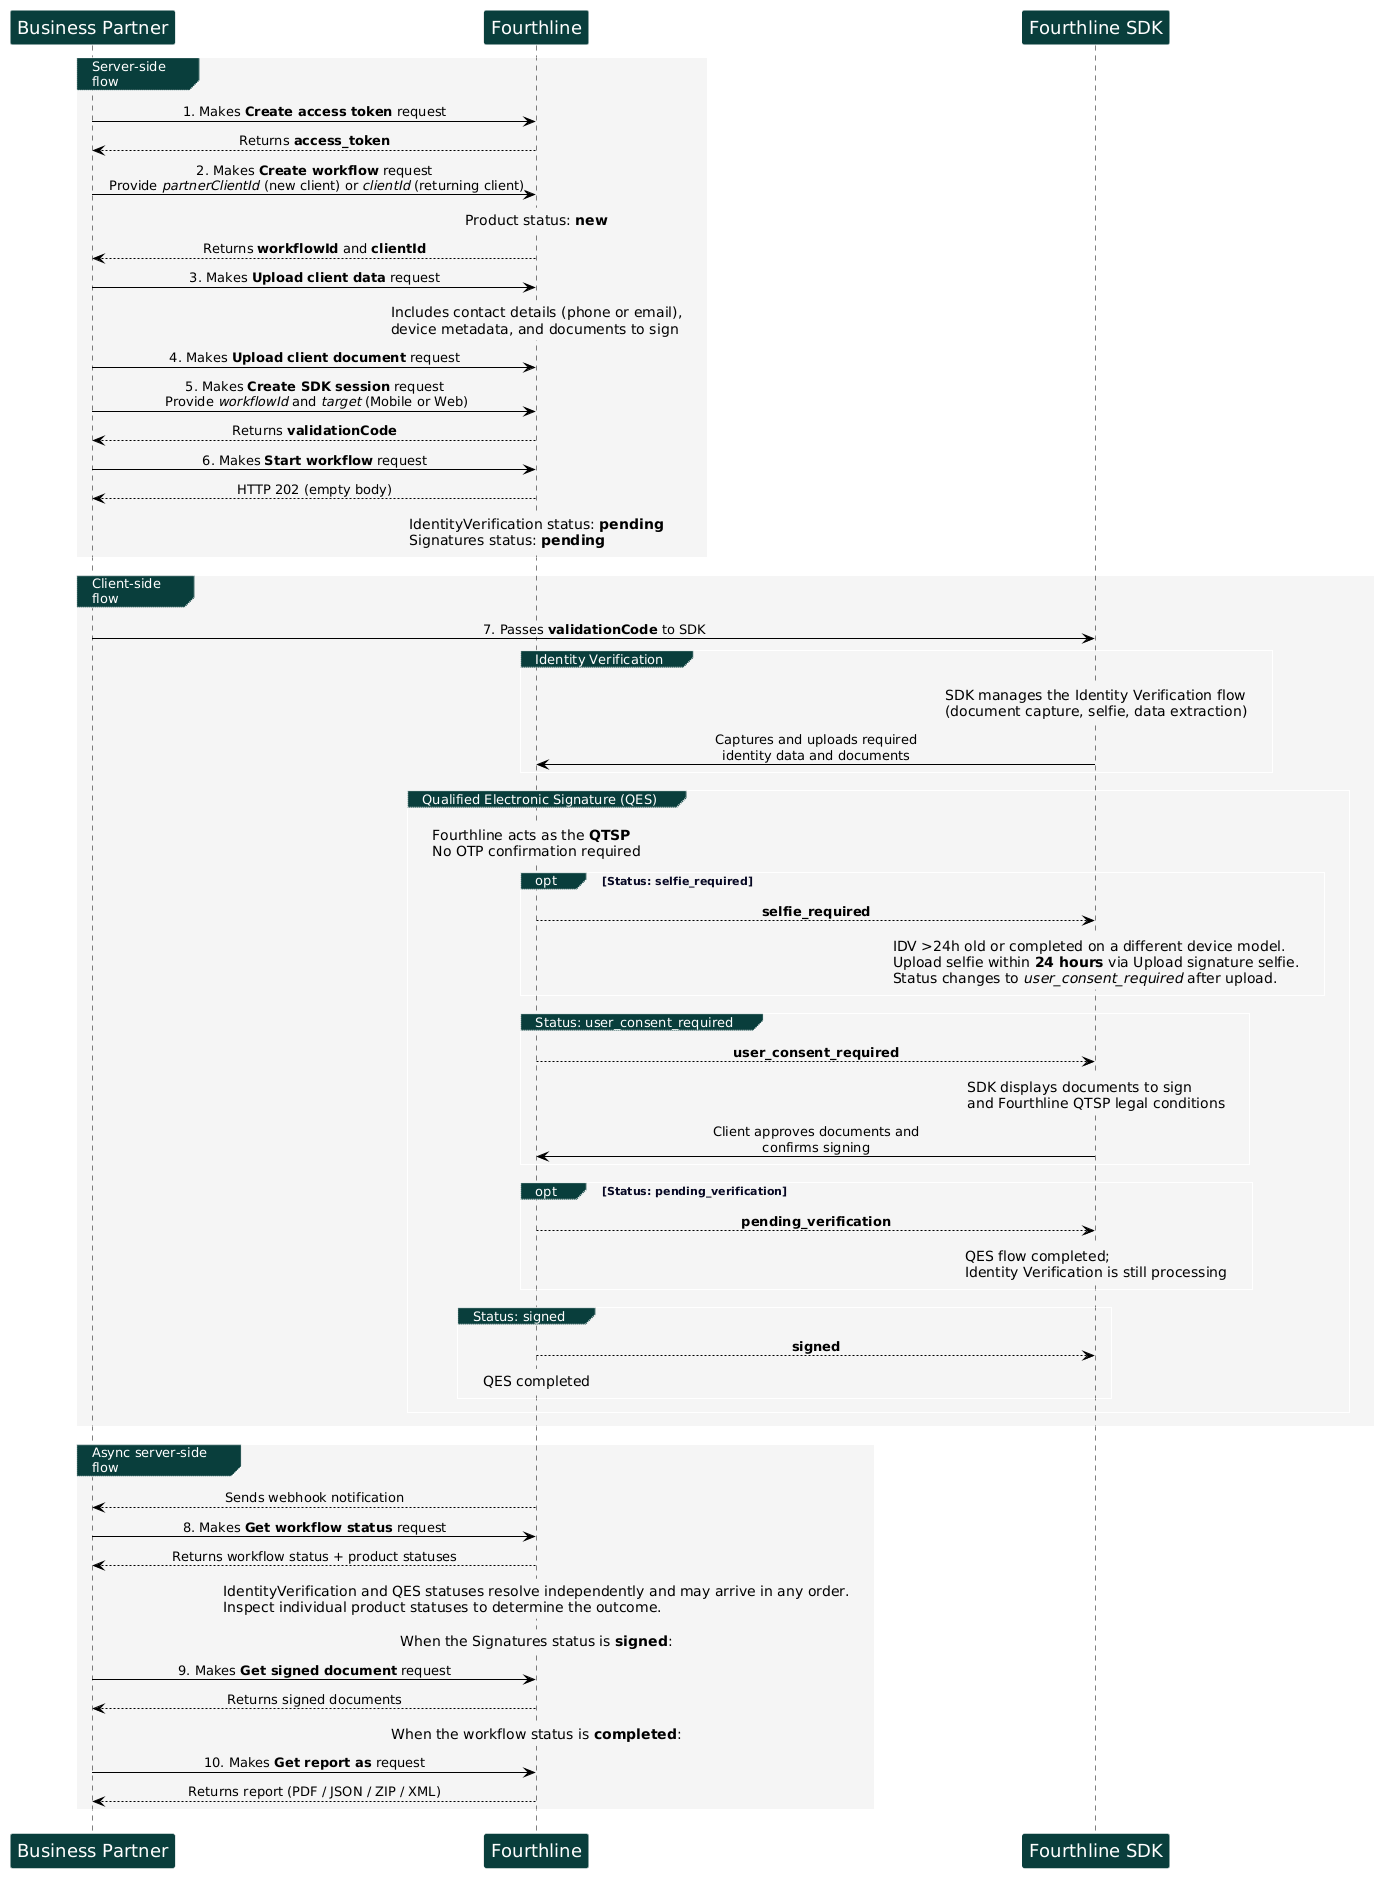
QES (Fourthline QTSP) with Identity Verification SDK flow
API-only signing flow
At a high level, an API-only QES integration follows this sequence:
- Create the workflow.
- Upload the required client data and documents.
- Start the workflow.
- Monitor
Signatures.status. - When
user_consent_required, get the signature details. - After the client approves the documents, authorize the signature.
- Sandbox only: After authorize, get the signature OTP.
- If needed, re-send the OTP.
- If a third-party QTSP requires confirmation, confirm the signature.
- When
Signatures.statusbecomessigned, download the signed PDFs.
Important
Use
Signatures.statusto determine the current signing step. Don't rely onworkflowStatusalone.After receiving a webhook, call Get workflow status and inspect
products[].name,products[].status, andproducts[].messages.
Upload QES data
Complete the uploads described in step three of the API v2 integration guide.
For QES, also provide the contact details and device metadata required by your workflow, and upload each document that the client needs to sign.
| Data | Purpose |
|---|---|
| Contact details | QTSP contact details and, where applicable, OTP delivery |
| Device metadata | Device verification |
| Documents to sign | Documents included in the signature flow |
Contact details
Contact detail requirements depend on the QTSP used by your workflow.
When using Fourthline as the QTSP, provide the client's phone number. We recommend providing a phone number whenever possible because it is supported by a wider range of QTSPs.
For API integrations, provide the client's contact details before the client reaches the contact-details step.
Important
Fourthline QTSP does not require OTP. Other QTSPs can require OTP as part of signature confirmation.
Required fields
| Field | Notes |
|---|---|
identityData.contactDetails.mobile | Client mobile phone number, when provided |
identityData.deviceMetaData | Include at least language, region, and model |
DocumentToSign uploads | Give each PDF a unique metadata id |
API reference:
Upload all QES-related data before calling Start workflow.
Missing or invalid data can result in statuses such as:
kyc_requiredinvalid_datafailed
Monitor the signing status
Track Signatures.status using webhooks or Get workflow status.
Signatures.status | What to do |
|---|---|
pending | Wait for processing |
selfie_required | Upload the required selfie within 24 hours |
kyc_required | Resolve Identity Verification eligibility |
user_consent_required | Retrieve the signature details and collect client consent |
confirmation_required | Confirm the signature when required by the QTSP. In sandbox, get the OTP after authorize. |
pending_verification | Wait for processing |
signed | Download the signed PDFs using Get signed document |
error | Inspect the product status codes and messages |
1. Get signature details
When Signatures.status becomes user_consent_required, call Get signature details.
The response provides the information required to present the signing step to the client, including:
- Documents to sign
- Legal conditions
- OTP settings
Present the documents and applicable legal conditions to the client before authorizing the signature.
2. Authorize the signature
After the client approves the documents, call Authorize signature.
Send the SHA-256 hash for each document the client approved.
Each documentId must match the metadata id used when uploading the corresponding DocumentToSign.
Typical request fields include:
authorizedDocuments[]documentIddocumentHashlegalDocumentsAccepted[]
A successful request:
- Returns
202 Accepted - Returns an
attemptId
What happens next depends on the QTSP used by the workflow.
| QTSP | Next step |
|---|---|
| Fourthline | No OTP confirmation is required. Continue monitoring Signatures.status. |
| Namirial or InfoCert | Wait for confirmation_required. In sandbox, get the OTP, then confirm the signature. |
3. Get signature OTP (sandbox only)
Sandbox environment only. After Authorize signature, when Signatures.status is confirmation_required, call Get signature OTP.
Use:
GET /v1/signatures/{workflowId}/otpPass the returned OTP in Confirm signature. Do not use this endpoint in production; production uses the SMS OTP.
4. Re-send OTP (only if needed)
If the client did not receive the OTP, call Re-send OTP.
5. Confirm the signature for third-party QTSPs
This step applies when Fourthline uses Namirial or InfoCert as the QTSP.
When Signatures.status becomes confirmation_required, submit the OTP using Confirm signature.
A successful request:
- Returns
202 Accepted - Returns an
attemptId
Important
Don't call
Confirm signaturebeforeSignatures.statusbecomesconfirmation_required.
6. Get signature report / signed PDFs
When Signatures.status becomes signed:
- Call Get signature status for the signature report.
- Download each signed PDF using Get signed document.
Handle selfie_required
selfie_requiredIf Signatures.status becomes selfie_required, the client must provide an additional selfie before signing can continue.
Upload the selfie within 24 hours using Upload signature selfie.
After a successful upload, the workflow transitions to user_consent_required.
Handle timeouts
Some signing steps must be completed within a fixed period.
| Step | Timeout | Recovery |
|---|---|---|
| Authorize signature | 2 hours | Create a new workflow if the signing session has expired |
| Confirm signature | 1 hour | Create a new workflow if the signing session has expired |
| Selfie upload | 24 hours | Complete the selfie upload before the timeout |
Timeout processing can complete up to 47 hours after the last update, depending on scheduled processing windows.
Troubleshooting
| Symptom | Likely cause | Recommended action |
|---|---|---|
kyc_required on QES-only | Identity Verification hasn't been completed for the provided clientId. | Create an Identity Verification workflow for the same clientId, then retry QES-only. Alternatively, create a QES with Identity Verification workflow. |
selfie_required | An additional selfie is required before signing can continue. | Call Upload signature selfie. After a successful upload, the workflow transitions to user_consent_required. |
400 on confirm | Signature authorization isn't complete. | Wait for confirmation_required before calling Confirm signature. |
422 after timeout | The signing session expired. | Create a new workflow. |
404 when retrieving signed documents | The workflow or document couldn't be found. | Verify the signature ID, document ID, and environment, then retry the request. |
409 on confirm | The OTP is invalid or has expired. | Enter a valid OTP. If the OTP has expired, start a new signing workflow. |
Test in sandbox
Use the following resources to test your integration:
- QES with Identity Verification Postman collection
- Get workflow status
- Get signature OTP (sandbox only, after Authorize signature)
Verify that:
- Workflow transitions occur as expected.
- Webhooks are delivered.
- Your integration handles timeouts.
- Signature retries behave as expected.
- Your integration handles each relevant
Signatures.status.
FAQ
Why does my PDF signature appear as unverified?
The PDF viewer you are using may not support the signature-validation capabilities required to verify the document.
A signature appearing as unverified does not by itself mean that the signature is invalid or that the document has been modified.
How can I verify the signature?
Open the PDF in Adobe Acrobat or Adobe Acrobat Reader and check the signature status there.
What about browsers and macOS Preview?
Chrome, Firefox, Safari, and macOS Preview should not be used to verify Fourthline PDF signatures. They may display the PDF without providing the signature-validation information available in Adobe Acrobat or Reader.
What your clients need to know?
Clients should open the PDF in Adobe Acrobat Reader to verify its digital signature. Web browsers and macOS Preview may not display the signature's verification status correctly.
Why does not Adobe Acrobat recognize a newly approved QTSP?
Adobe Acrobat does not check the live EU Trusted Lists when validating a signature. Instead, it uses a local snapshot of qualified trust providers derived from the EU Trusted Lists and updated periodically by Adobe.
As a result, a newly approved Qualified Trust Service Provider (QTSP) may not be recognized in Acrobat immediately after being added to a Member State Trusted List.
How long can it take for Adobe Acrobat to recognize a new QTSP?
Adobe typically publishes an updated EUTL-derived trust snapshot once a month, usually during the first week of the month.
It can take up to approximately 30 days for a change to a Member State Trusted List to be reflected in Adobe's trust data. After Adobe publishes the update, an Acrobat installation may take up to an additional 14 days to download the updated trust data.
What contact details are required for QES?
When using Fourthline as the QTSP, you must provide either the client's phone number or email address. We recommend providing a phone number whenever possible because it is supported by a wider range of QTSPs.
For API integrations, provide the client's contact details before the client reaches the contact details screen. If the contact details have already been provided, the SDK skips this screen.
Support
For questions about your workflow configuration or signing setup, contact your Fourthline delivery manager.
Updated 1 day ago