
Web SDK Setup
Integration Options
This page sets out step-by-step instructions for setting up the Web SDK.
Embedding manual
To embed your Web SDK, follow these steps:
1. Import the JavaScript files
Import the following scripts. You can put them in the head or inline in the HTML:
<!DOCTYPE html>
<html lang="en">
<head>

  ...

  <script type="module" src="https://sandbox.v.fourthline.com/v1/build/web-sdk-v2.esm.js"></script>
  <script nomodule src="https://sandbox.v.fourthline.com/v1/build/web-sdk-v2.js"></script>
</head>
Note
- If you use a custom domain or a customized Fourthline domain for the workflow, replace
sandbox.v.fourthline.comwith the URL of your test or Production environment, as agreed with your Fourthline delivery manager.- The sandbox environment is intended for implementation and testing only. When you migrate to Production, remove Sandbox from the URL.
2. Add the flow tag
Add the custom flow tag to the HTML or in the template of the relevant component.
The tag is only rendered after the source for it is loaded.
<!DOCTYPE html>
<html lang="en">
<head>

  ...

  <script type="module" src="https://sandbox.v.fourthline.com/{version, e.g.v1}/build/web-sdk-v2.esm.js"></script>
  <script nomodule src="https://sandbox.v.fourthline.com/{version, e.g. v1}/build/web-sdk-v2.js"></script>
</head>
<body>

  /* Somewhere in the page */

  <div class="container">
  	<fl-flow-onboarding></fl-flow-onboarding>
  </div>

</body>
</html>
3. Localize the UI
To configure the UI language and level of formality, pass the following attributes to the fl-flow-onboarding component.
| Attribute | Description |
|---|---|
locale | The language for the UI. Format: ISO 3166-1 alpha-2 country code Example: nl |
formality | The level of formality. Enum: • formal, e.g. "u" in Dutch• informal, e.g. "jij" in Dutch |
Supported languages and formality:
| Language | Locale | Formality |
|---|---|---|
| English (default) | en | informal |
| Bulgarian | bg | informal |
| Croatian | hr | informal |
| Czech | cs | informal |
| Danish | da | informal |
| Dutch | nl | formal, informal |
| Estonian | et | informal |
| Finnish | fi | informal |
| Flemish | vl | informal |
| French | fr | formal |
| German | de | formal |
| Greek | el | formal |
| Italian | it | informal |
| Polish | pl | informal |
| Portuguese | pt | formal |
| Maltese | mt | informal |
| Norwegian (Bokmål) | no | informal |
| Romanian | ro | formal |
| Slovak | sk | informal |
| Slovenian | sl | informal |
| Spanish | es | informal |
| Turkish | tr | informal |
Example code:
<fl-flow-onboarding
  locale="nl"
  formality="formal"
></fl-flow-onboarding>If you don't set the locale attribute, we check if the browser settings locale is:
- Supported: We set the browser settings as the SDK
locale. - Not supported: We check the
langattribute in thehtmltag.
If the lang attribute is:
- Supported: We set it as the SDK
locale. - Not supported: The SDK
localedefaults toen(English).
4. (Optional) Configure QR/SMS tabs
Choose which initiation methods are available to clients when starting the workflow. By default, both QR code and SMS options are displayed.
Use the tabs attribute on the<fl-flow-onboarding> component to control which tabs are shown:
| Configuration | Description |
|---|---|
tabs='["qr"]' | Show only QR code option |
tabs='["sms"]' | Show only SMS option |
tabs='["qr","sms"]' | Show both options (explicit) |
No tabs attribute | Show both options (default behavior) |
Note
When configuring tabs in JavaScript, set the
tabsproperty before adding the component to the DOM. Thetabsproperty is initialized only once and cannot be updated after the component has loaded. Updating it withsetAttribute()or by assigning a new value to the property is not supported.
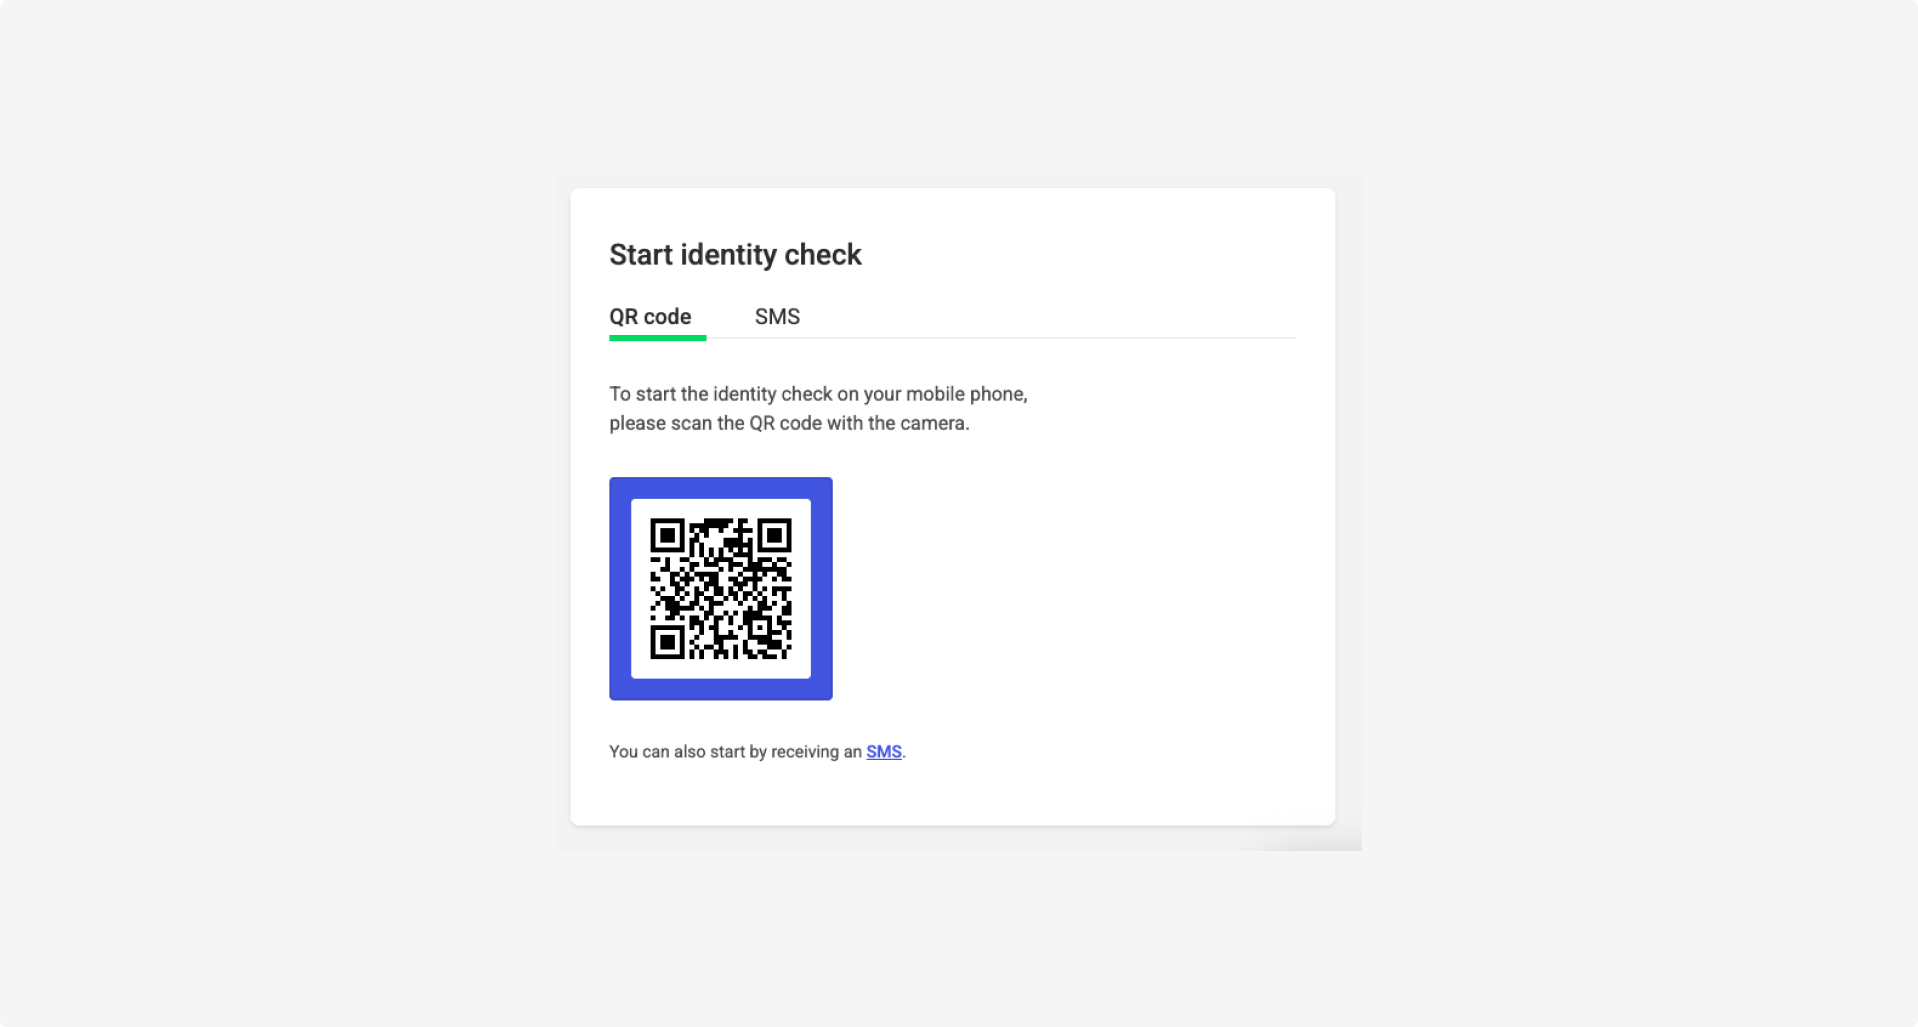
QR code and SMS tabs are configured
Example code:
// tabs is an array prop: assign it as a JavaScript property,
// and set it BEFORE the element is added to the DOM.
// The component reads tabs once on load; later changes are ignored.
const onboarding = document.createElement('fl-flow-onboarding');
onboarding.tabs = ['qr'];          // :white_check_mark: property, before append
onboarding.token = 'YOUR_TOKEN';
document.body.appendChild(onboarding);

// :x: Will not work - setAttribute stores a string; the array prop is not populated.
//   onboarding.setAttribute('tabs', JSON.stringify(['qr']));
// :x: Too late - the component has already loaded.
//   document.getElementById('onboarding-flow').tabs = ['qr'];
<!-- Show only QR tab -->
<fl-flow-onboarding tabs='["qr"]' token="YOUR_TOKEN"></fl-flow-onboarding>

<!-- Show only SMS tab -->
<fl-flow-onboarding tabs='["sms"]' token="YOUR_TOKEN"></fl-flow-onboarding>

<!-- Show both -->
<fl-flow-onboarding tabs='["qr","sms"]' token="YOUR_TOKEN"></fl-flow-onboarding>

<!-- OR default behavior - "no tabs" (Show both)  -->
<fl-flow-onboarding token="YOUR_TOKEN"></fl-flow-onboarding>
5. Link to the workflow
To link the redirect flow (fl-flow-onboarding) to the workflow, pass the validationCode returned in the Create SDK session response to the component.
Either set the validationCode as an HTML attribute:
<!DOCTYPE html>
<html lang="en">
<head>

  ...

  <script type="module" src="https://sandbox.v.fourthline.com/{version, e.g.v1}/build/web-sdk-v2.esm.js"></script>
  <script nomodule src="https://sandbox.v.fourthline.com/{version, e.g. v1}/build/web-sdk-v2.js"></script>
</head>
<body>

  /* Somewhere in the page */

  <div class="container">
  	<fl-flow-onboarding token="{validationCode}"></fl-flow-onboarding>
  </div>

</body>
</html>Or, set the token in JavaScript:
const flow = document.getElementById('onboarding-flow');

flow.setToken('TOKEN_OF_THE_VERIFICATION');
Note
The
validationCodeis single-use. If you use server-side rendering, ensure that it is consumed only after it reaches the client.
6. Redirect to mobile onboarding
When redirecting the client to the workflow from their mobile browser, the SDK emits an fl-flow-onboarding event (mobile/desktop).
If we detect the client's mobile device, we display a Continue to mobile device screen with a Continue button.
When the client taps Continue, the SDK emits an flContinueMobileRequest event.
Caution
To allow the client to start the workflow, your backend must handle the
flContinueMobileRequestevent.If it does not, the workflow won't start, and the Continue button will appear unresponsive to the client.
The flContinueMobileRequest event contains a redirectHandler function in the event.detail payload. This function specifies what the SDK should do when the client completes the workflow.
If you provide URLs to your Success page and Failure page, the SDK redirects the client there. If you don't provide them, we display a message telling the client they have completed the flow and should return to your website.
To start the workflow in a new browser tab, call the redirectHandler function without providing success or failure page URLs.
document.addEventListener('flContinueMobileRequest', (e) => {
  const redirectHandler = e.detail;
  redirectHandler();
});
7. Handle status events
At each step of the workflow, the SDK emits an flOnboardingStatus event (desktop) that you can subscribe to.
You can use the status to trigger any required actions on your side, e.g. when you receive OnboardingStarted status and before you receive Loaded status, you could display a ghost placeholder image.
The flOnboardingStatus event emits the following statuses:
| Event status | Description |
|---|---|
OnboardingStarted | The validation code has been used. |
Loaded | The SDK is loaded and the redirect options are displayed to the client. |
OnboardingContinuing | The client has been successfully redirected and has started the workflow. |
OnboardingCompleted | The client has successfully completed the workflow. Suggested action: Redirect the client to your Success page or email them about next steps. |
OnboardingCompletedError | The client has completed the workflow with one or more errors and we have displayed the Failure screen. Suggested action: Redirect the client to your Failure page or email them about next steps. |
To listen to this event, add the following JavaScript snippet to your website HTML. For each event status, define and implement the required behavior on your side.
Example code:
document.addEventListener('flOnboardingStatus', (event) => {
  const { detail: status } = event;
  if (status === 'Loaded') {
    // Put your code here
  }
  if (status === 'OnboardingCompleted') {
    // Put your code here
    // e.g. Remove the fl-flow-onboarding element from the DOM and render your success page
  }
  if (status === 'OnboardingCompletedError') {
    // Put your code here
  }
});
8. Handle restart event
If the client requests to restart the redirect flow, the SDK emits an flOnboardingRestartRequest event (desktop) that you can subscribe to and handle. It is triggered from the error screen when the client taps Try again and the flow has encountered a non-recoverable error.
This event does not emit any values.
To handle this event:
-
Listen to it.
-
Create a new workflow.
-
Create a new SDK session.
-
To set the new validation code, either:
- Invoke the
setToken(newValidationCode)method, or - Replace the existing HTML tag with a new tag containing the updated
<fl-onboarding token="newValidationCode"></fl-onboarding>token.\
Example code:
document.addEventListener('flOnboardingRestartRequest', () => {
  const onboardingTag = document.getElementBy('fl-onboarding');

  // Generate a new validation and validation code

  onboardingTag.setToken(newValidationCode);
});
Updated 1 day ago