
Document Authentication Integration
Integration guide
This page provides a step-by-step guide on how to integrate Document Authentication.


API guide
This guide provides step-by-step instructions on how to integrate Document Authentication via our API.
Before you begin, make sure you have completed the required setup.
Flow
Click to magnify
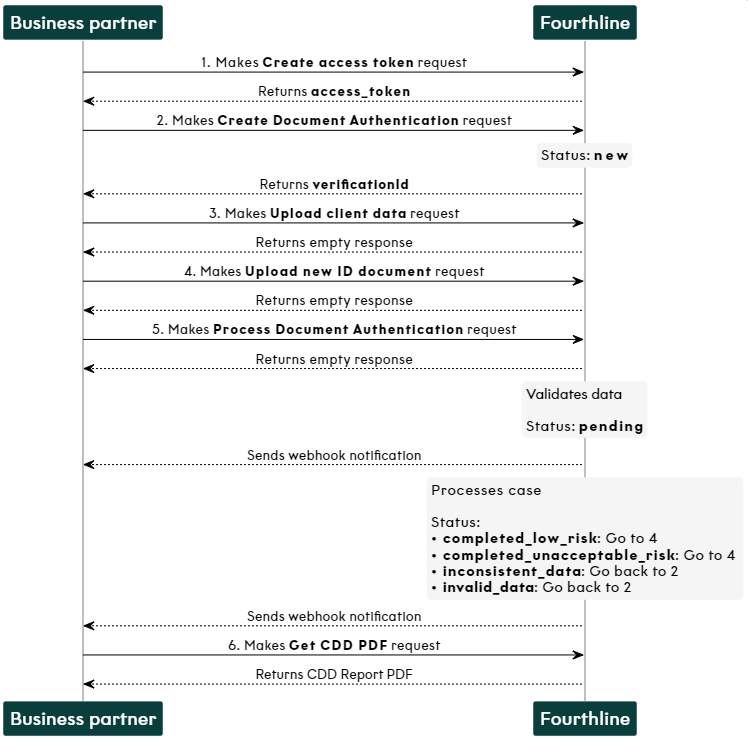
Document Authentication API flow
1. Authenticate
Create an access token to authenticate in our API:
- You provide your Fourthline API key.
- You receive an
access_token.
API Reference – Create access token

If your token expires, make another Create access token request.
2. Create a case
Create a Document Authentication case:
- You specify the case type and provide the
clientIdfrom a previous successful Identity Verification case and your case identifier. - You receive a
verificationId.
API Reference – Create Document Authentication
 Status: The case status changes to
 new.
3. Upload client data
Upload the client's identity data:
- You provide the
verificationIdand the relevant data. - A successful response is empty.
API Reference – Upload client data
Status: The case status remains new.
4. Upload new ID document
Upload the client's new ID document:
- You provide the
verificationId, the document data, and the document file. - A successful response is empty.
API Reference – Upload new ID document
User guide
-
Make a separate request for each different
documentTypeand always:- Specify the document type in the request.
- Include at least 1 file per document type.
- Provide information about each file or it is ignored.
-
If there is an
EmbeddedFacefile (the portrait from the NFC chip), always upload it after uploading the ID document. ThedocumentNumberin theEmbeddedFacefile request must match the ID document.
Updating document data
After uploading an ID document, you can send new requests to update the document and its information:
- To add a new file, specify the same
documentTypeanddocumentNumber(if relevant), or the file is considered a new document. - To update the content or data of a file, specify the same
fileName(case sensitive), or the file is added as a new file:- Provide 1 unique filename per client.
- PDF documents aren't updated.
Status: The case status remains new.
5. Trigger case processing
Request Fourthline to process the case:
- You provide the
verificationId. - A successful response is empty.
API Reference – Process Document Authentication
Status: The case status changes to one of the following with the associated webhook notification:
| Status | Description | Action |
|---|---|---|
pending | We are validating the data. | Wait. |
inconsistent_data | We found inconsistent data. Webhook: more_info_required | Retry. |
invalid_data | We found invalid data. Webhook: more_info_required | Retry. |
completed | We have processed the case. See the risk code: • 200: Low risk • 500: Unacceptable risk Webhooks: completed or rejected | Download the CDD Report. |
Check case status
When you receive webhook notifications, we recommend also requesting the full details:
- You provide the
verificationId. - You receive the case status and other relevant information.
API Reference – Get Document Authentication status
6. Download CDD Report
When the case status is completed, download the CDD Report:
- You provide the
verificationId. - A successful response is empty and the report is downloaded.
API Reference – Get CDD PDF

Updated 3 months ago