
German Solution Integration
Integration Guides


Web SDK guide
This guide provides step-by-step instructions on how to integrate the German Identity Verification solution with the Web SDK.
Before you begin, make sure you have completed the following:
Flow
Click to magnify
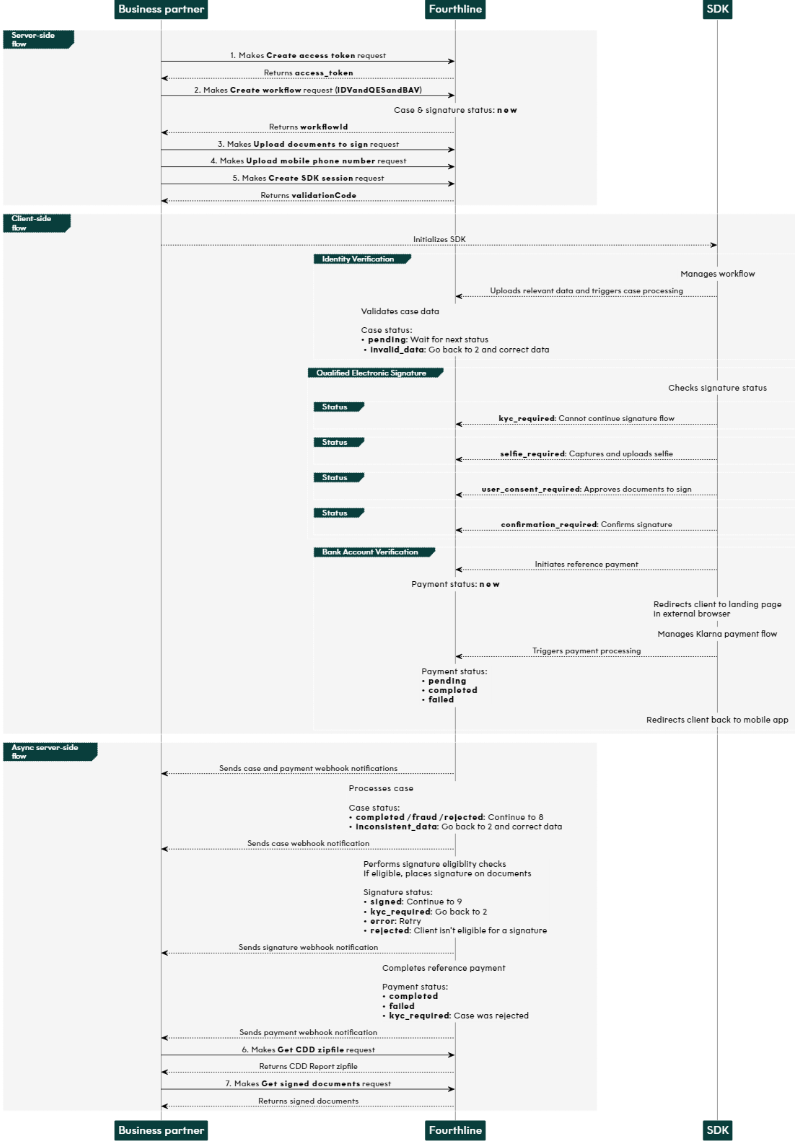
German solution Web SDK flow
1. Authenticate
Create an access token to authenticate in our API:
- You provide your Fourthline API credentials.
- You receive an
access_token.
API Reference – Create access token

If your token expires, make another Create access token request.
2. Create workflow
Create a workflow, providing your unique identifier for the client:
- You specify the
workflowNameand provide your unique identifier for the client. - You receive a
workflowIdand a FourthlineclientId.
API Reference – Create workflow
 Status: The Identity Verification case status and signature status change to
 new.
Fourthline checks that the case status is one of the following:
| Flow | Status |
|---|---|
| Completed verification | completed with a risk score of 200 – 400 (not 500) |
| Pending verification | new, pending, or completed with a risk score of 200 – 400 (not 500) |
If the Identity Verification case status is valid, we perform the initial identity document check, and (if configured) the sanctions check.
Status: The signature status changes to one of the following and we send a webhook notification:
| Status | Description | Action |
|---|---|---|
pending | The client is eligible for a signature. | Wait. |
kyc_required | The client didn't pass one or more eligibility checks. | Create a new workflow that includes IDV and QES. |
- Upload identity data
If configured, upload relevant identity data:
- You provide the
verificationIdand relevant data points. - A successful response is empty.
API Reference – Upload identity data
3. Upload documents to sign
Upload to Fourthline the document(s) you want the client to sign:
- You provide the
workflowId, information about the documents, and the files. - Documents can be uploaded in parallel as long as each document uses a unique
document_id. - Requests around 26 MB may hit the default request size limit.
- For optimal reliability and experience, we recommend keeping the number of documents per signature low (typically two or three).
- A successful response is empty.
API Reference – Upload documents to sign
Status: The signature status remains pending.
4. Upload mobile number
Upload the client's mobile phone number for them to receive the passcode SMS to confirm the signature:
- You provide the
workflowIdand the phone number. - A successful response is empty.
API Reference – Upload mobile phone number
Status: The signature status remains pending.
5. Create SDK session
Create the Web SDK session:
- You provide the
workflowId. - You receive an 8-digit, alphanumerical
validationCodeto pass to the SDK in your backend.
If the client starts on your website in their:
- Desktop browser: Initialize the Web SDK, display the redirect options, and redirect the client to the workflow in their mobile browser.
- Mobile browser: Display the redirect options and then redirect them to the workflow on your subdomain.
API Reference – Create SDK session
• If the client stops in the middle of the workflow, you need to create a new SDK session.
• When the client closes the browser, the
validationCode is invalidated and cleared from the cache. Status: The case status changes to one of the following and we send the relevant webhook notification:
| Status | Description | Action |
|---|---|---|
pending | The data is valid. | Wait for the next status. |
invalid_data | We found invalid or missing data. | Create a new workflow. |
Status:The case status then changes to one of the following and we send a webhook notification:
| Status | Description | Action |
|---|---|---|
inconsistent_data | We found inconsistent data. | Create a new workflow. |
completed | We have processed the case. For our recommendation to accept or reject the client, see the risk code. | Download the CDD Report. |
- Check case status
When you receive webhook notifications, we recommend also requesting the full case details:
- You provide the
verificationId(same value as theworkflowId). - You receive all the data on the case.
API Reference – Get case status
Status: The signature status changes to one of the following and we send a webhook notification:
| Status | Description | Action |
|---|---|---|
signed | The signed documents are available. |
- Check signature status
When you receive webhook notifications, we recommend also checking the signature status:
- You provide the
signatureId(same value as theworkflowId). - You receive the current status and status code.
API Reference – Get signature status
6. Download CDD Report
When the case status is completed, download the CDD Report zipfile:
- You provide the
workflowId. - A successful response is empty and the report is downloaded.
API Reference – Get CDD zipfile
7. Download signed documents
When the signature status is signed, download each signed document:
- You provide the
signatureId(same value as theworkflowId) and relevantdocumentId. - You receive a message in plain text and the PDF document.
API Reference – Get signed document
If you have the fallback QTSP option configured, check if an InfoCert contract was generated, which you are required to download and share with the client:
- You provide the
signatureId(same value as theworkflowId). - You receive one of the following empty responses:
200: The signature flow was directed to InfoCert and the response returns the contract to share with the client.204: The signature flow was directed to Namirial so no contract is returned.
API Reference – Get InfoCert contract

Updated about 1 month ago