
Operations
Fourthline Hub
Use the Self-Service Hub to manage API credentials, integrations, and workflow configurations, and to monitor your clients.
Integrations
Use Integrations to connect your systems to Fourthline. Authenticate requests with API credentials and receive updates through webhooks.
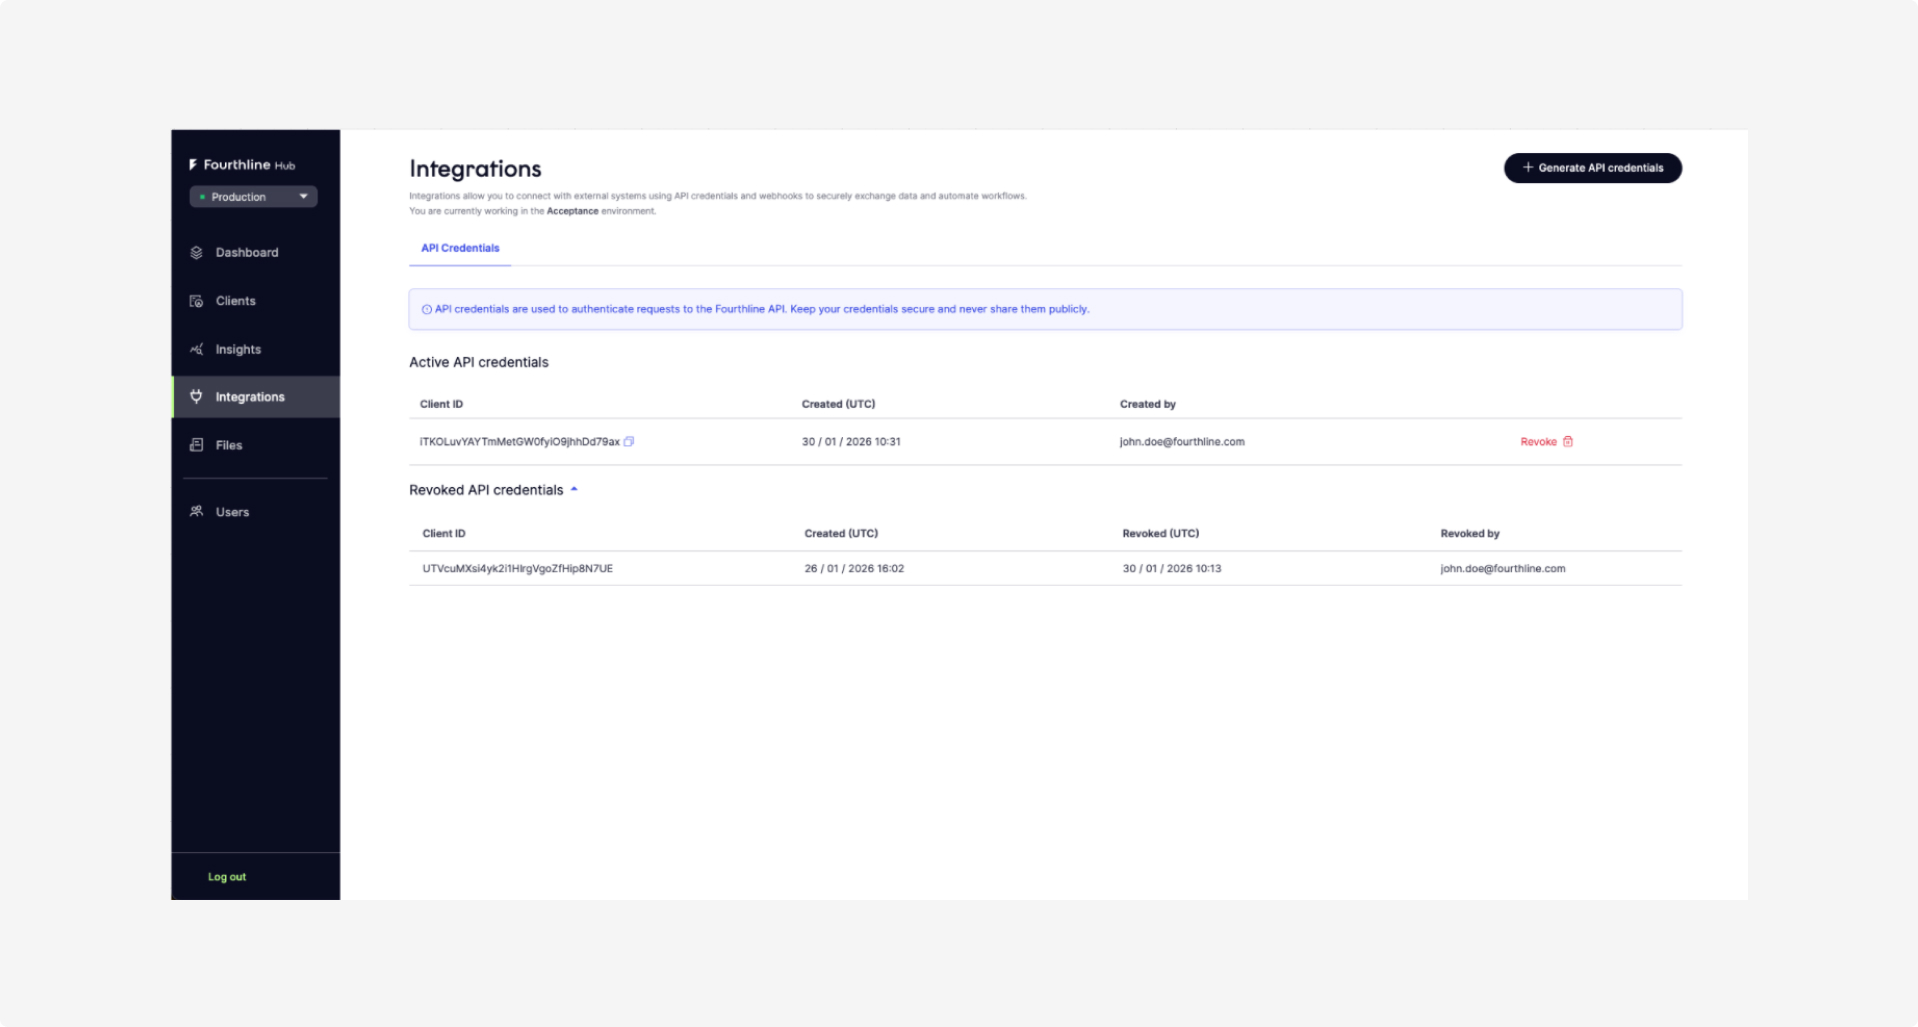
Hub Integrations
Prerequisites
-
Developer user role to manage API credentials. Organization Admins can assign roles on the Users page.
-
For Prospect account, an active trial is required to access this page.
Trial API credentials allow you to retrieve results from test workflows using the available endpoints.
Generate API credentials
Generate API credentials to authenticate your application when making requests to the Fourthline API.
- Go to the Integrations page and open the API credentials tab.
- Select Generate API credentials.
The credentials are generated and activated immediately.
- Copy and store your client secret securely.
Important
The client secret is shown only once. Copy it and store it securely. After you close the window, you cannot retrieve the client secret again.
- Test your credentials by creating an access token - see Create access token.
The newly generated credentials appear at the top of the Active API credentials list, and include:
- The Client ID
- The Created timestamp
- The email address of the user who created the credentials
Security best practices
After you copy your credentials from the Hub, follow these best practices to keep them secure:
- Only grant access to staff who need it. Follow the principle of least privilege.
- Use a password manager or secrets management service. Tools like 1Password, HashiCorp Vault, or AWS Secrets Manager provide secure credential storage.
- Never store credentials in version control systems. Don't commit secrets to Git, even in private repositories.
- Do not embed credentials in client-side code. This includes mobile applications, JavaScript, or any code that could be exposed to attackers.
Revoke API credentials
You can revoke API credentials at any time.
Important
Once revoked, any system, application, or integration using these credentials will immediately lose access to the Fourthline API.
Before you decide to revoke API credentials, ensure you have another active set of credentials to prevent service interruption.
Fourthline allows multiple active credentials simultaneously to support safe credential rotation.
To revoke API credentials:
- Select your environment:
- If you have a Business Partner account, use the environment selector in the top left to choose Sandbox or Production.
- Prospect accounts only have access to Sandbox and don't see this selector.
-
Go to the Integrations page and open the API credentials tab.
-
In the Active API credentials list, find the credentials you want to revoke and select Revoke.
-
In the confirmation dialog, confirm that you want to revoke the credentials for the selected environment.
-
Test the revocation by making an API request with the revoked credentials. The system will now return an
Authenticationerror.
View revoked credentials
The revoked credentials appear at the top of the Revoked API credentials list with the following details:
- Client ID
- Created timestamp
- Revoked timestamp
- Email address of the user who revoked the credentials
This information is maintained for audit trail purposes.
View webhook configurations
Viewing webhook configurations is available only to users with a Business Partner account, and for V2 Integrations.
To configure webhooks, see Webhooks.
To view your webhook configurations:
-
In Hub, go to the Integrations page and open the Webhooks tab.
-
Under Active Webhooks, review your configured webhooks.
-
Review the Workflow column.
- Default indicates that the webhook applies to all workflows unless a workflow-specific webhook has been configured.
- A workflow-specific webhook overrides the default webhook for that workflow. In this case, the Workflow column displays the workflow name instead of Default.
-
Click the control for a webhook to view its full configuration.
To create a new webhook, select the appropriate environment (Sandbox or Production) and click Add Webhook.
Clients
The Clients tab shows client records in reverse chronological order (most recent first). Built-in filters let you quickly find clients by status, workflow, or other key attributes.
In Hub go to Clients and open the Clients tab.
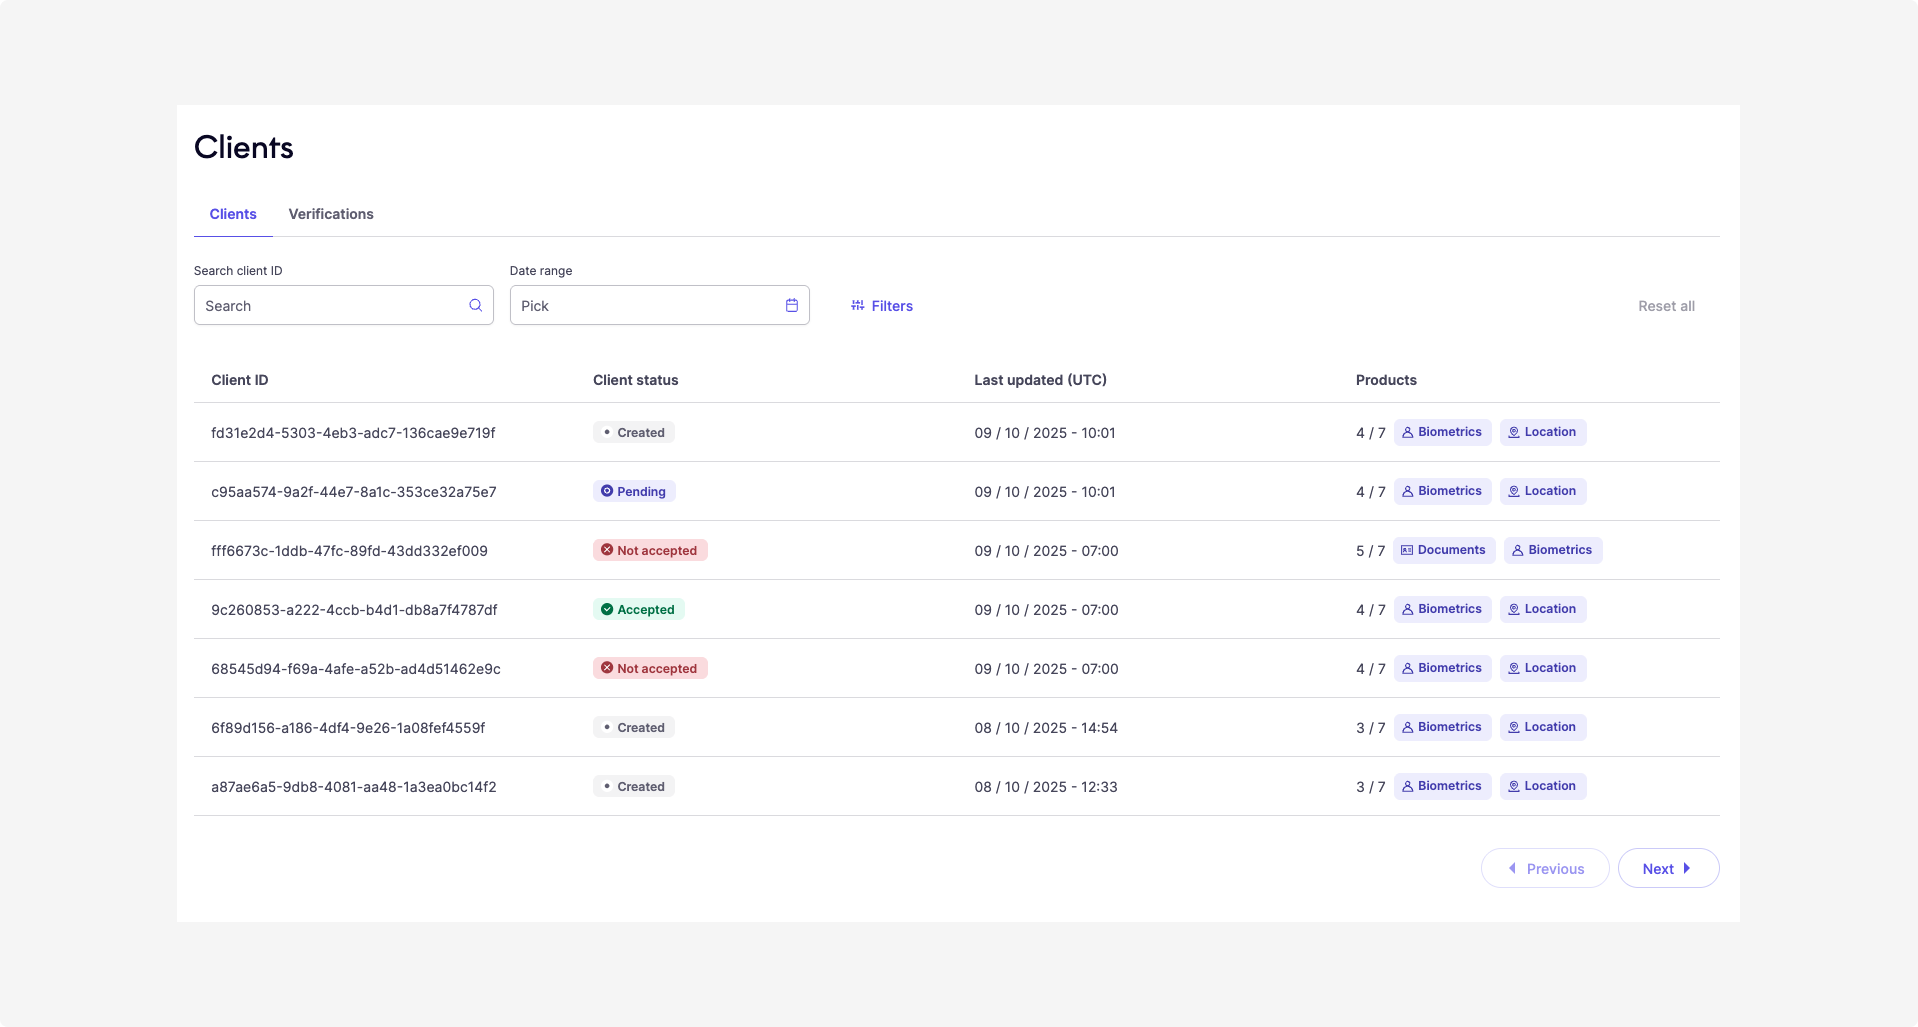
Hub Clients tab
Overview
In the Clients tab, each row shows a snapshot of a client’s key details, including:
| Field | Description |
|---|---|
| Client ID | Fourthline’s unique identifier. Select the ID to copy it. |
| Client status | Indicates the current state of the client’s verification journey. Statuses include: - Created: Client hasn’t completed onboarding. Validation can’t begin. - Pending: Verification in progress, no verdict yet. - Accepted: At least one verification succeeded (status: success).- Not accepted: All verifications failed. |
| Last updated (CET/CEST) | Displays the most recent timestamp (in CET/CEST) when the client record was updated. A client is considered updated when: - The client status changes. - The verification status of any related product is updated. |
| Products | Shows how many verification products are enabled for each client. |
Filters
Use filters to narrow the list of clients as follows:
| Filter option | Description |
|---|---|
| Search | Enter a verification ID or client ID. |
| Date range | Filter by last updated timestamp. |
| Client status | Select one or more statuses. |
| Products | Show clients with at least one of the selected products. |
Select Reset all to clear all filters.
Verifications
Verifications are individual checks performed as part of a client’s onboarding workflow.
In Hub go to Clients and open the Verifications tab.
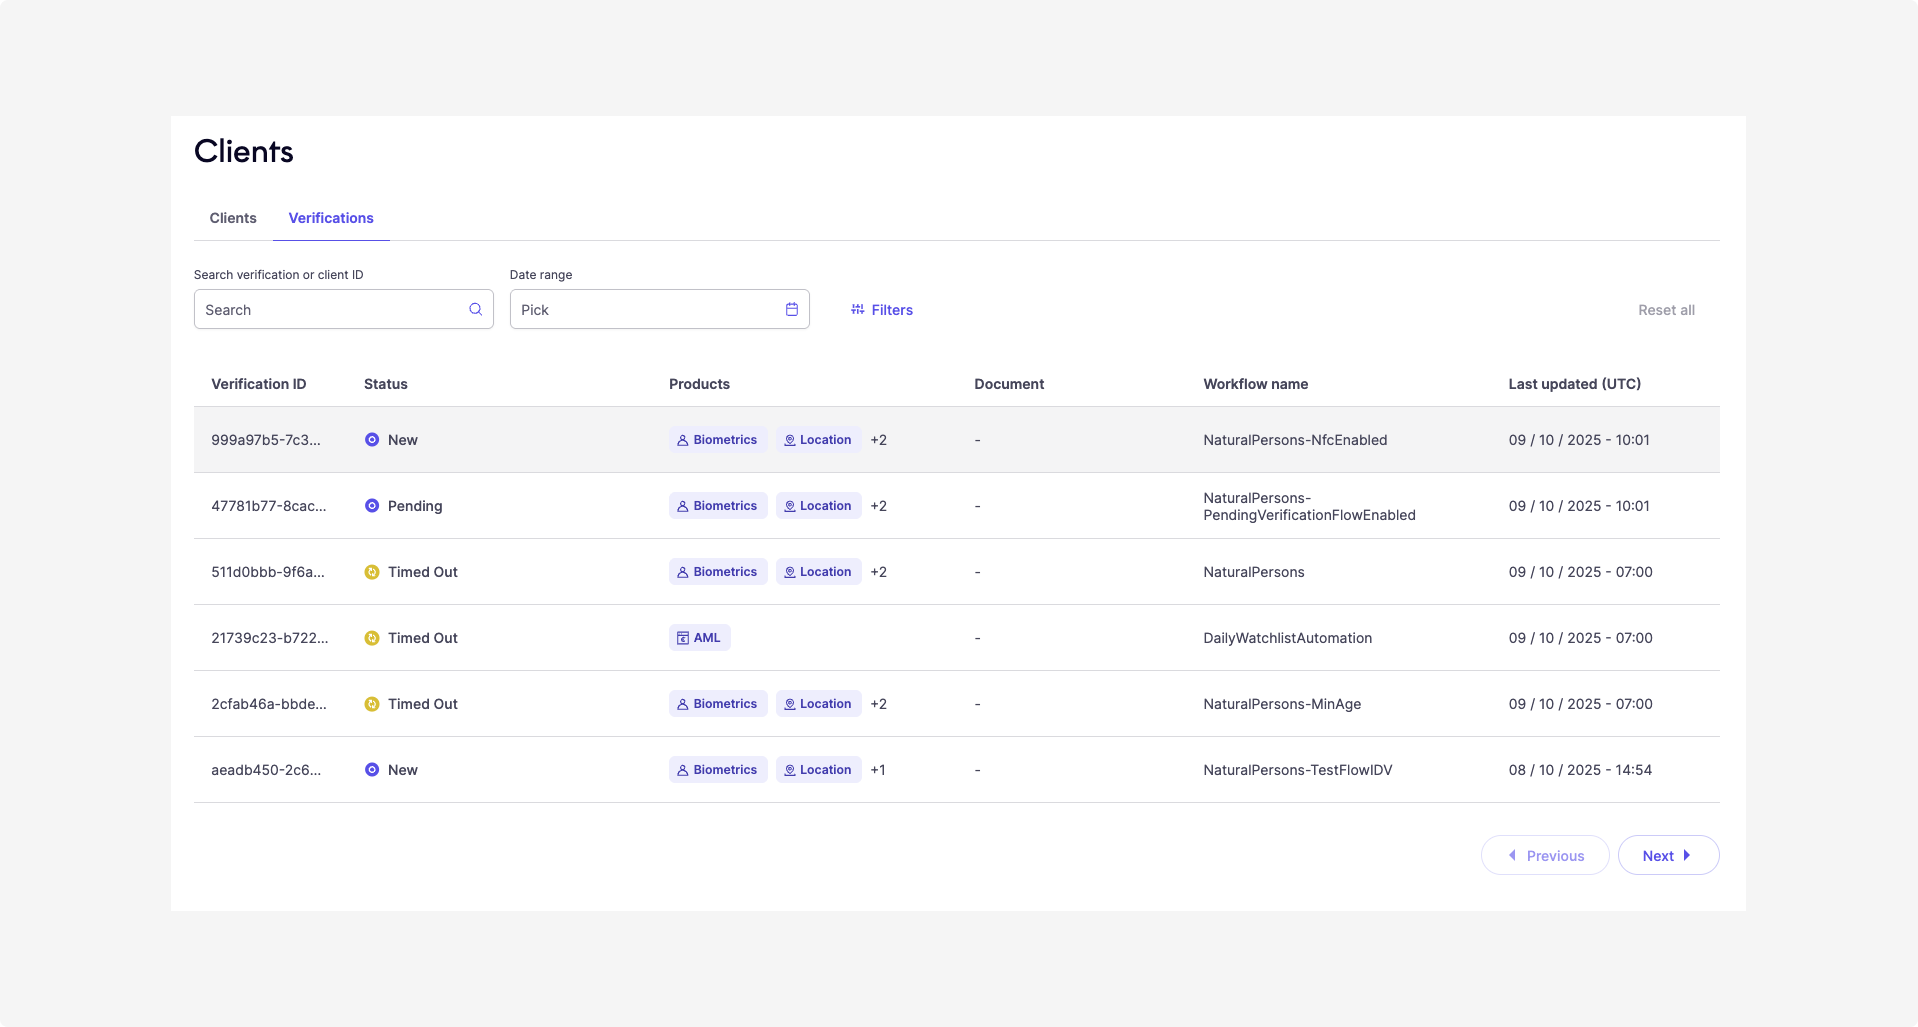
Hub Verifications tab
Overview
Each verification has one status at a time, and can include:
- Verification ID: Unique identifier (workflow ID or signature ID).
- Status: Color-coded for quick interpretation:
| Color | Meaning | Possible statuses |
|---|---|---|
| Blue | Client action required | new, pending, consent required, confirmation required, selfie required, pending verification |
| Green | Verification successful | success |
| Yellow | Failed, retry allowed | error, timed out, failed, inconsistent data, invalid data, invalid signature, kyc required |
| Red | Failed, no retry | fraud, rejected |
Tip
For red and yellow statuses, hover over the status to see a full description and the related status codes.
- Products: Products covered by the verification. Hover to see all enabled.
- Document: Issuing country and type of primary ID document (if any).
- Workflow name: Configured workflow or legacy process/branch.
- Last updated (CET/CEST): Timestamp of latest status change. Example: from
pending→success.
Filters
Use filters to narrow the list as follows:
| Filter option | Description |
|---|---|
| Search | Enter a verification ID or client ID. |
| Date range | Filter verifications by last updated timestamp. |
| Status | Select one or more statuses. |
| Products | Select one or more products to show clients who have at least one of the selected products enabled. |
| Documents | Filter verifications by issuing country and document type. |
| Workflow name | Filter verifications by specific workflow names. |
Select Reset all to clear filters.
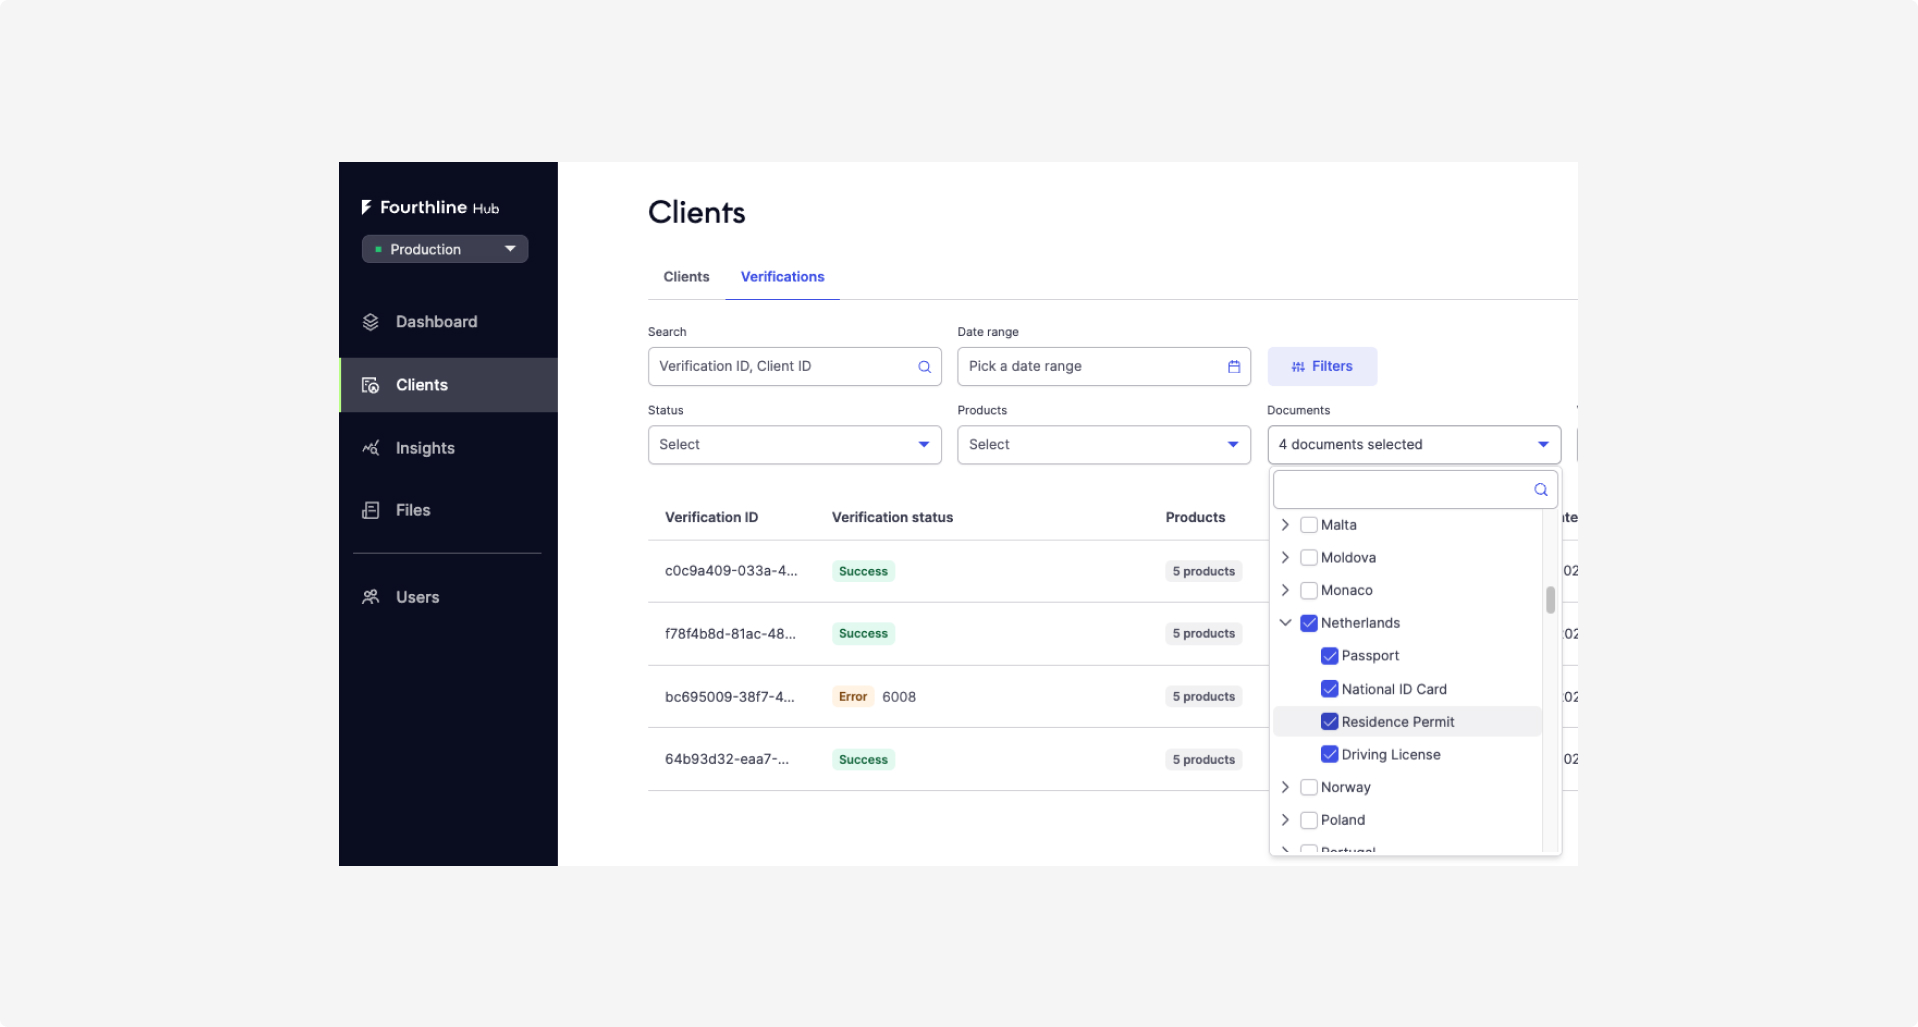
Hub Documents filter
Verification details
You can view detailed insights, such as verification timelines, the user journey, and uploaded media files, by selecting a client from Clients or a verification from Verifications.
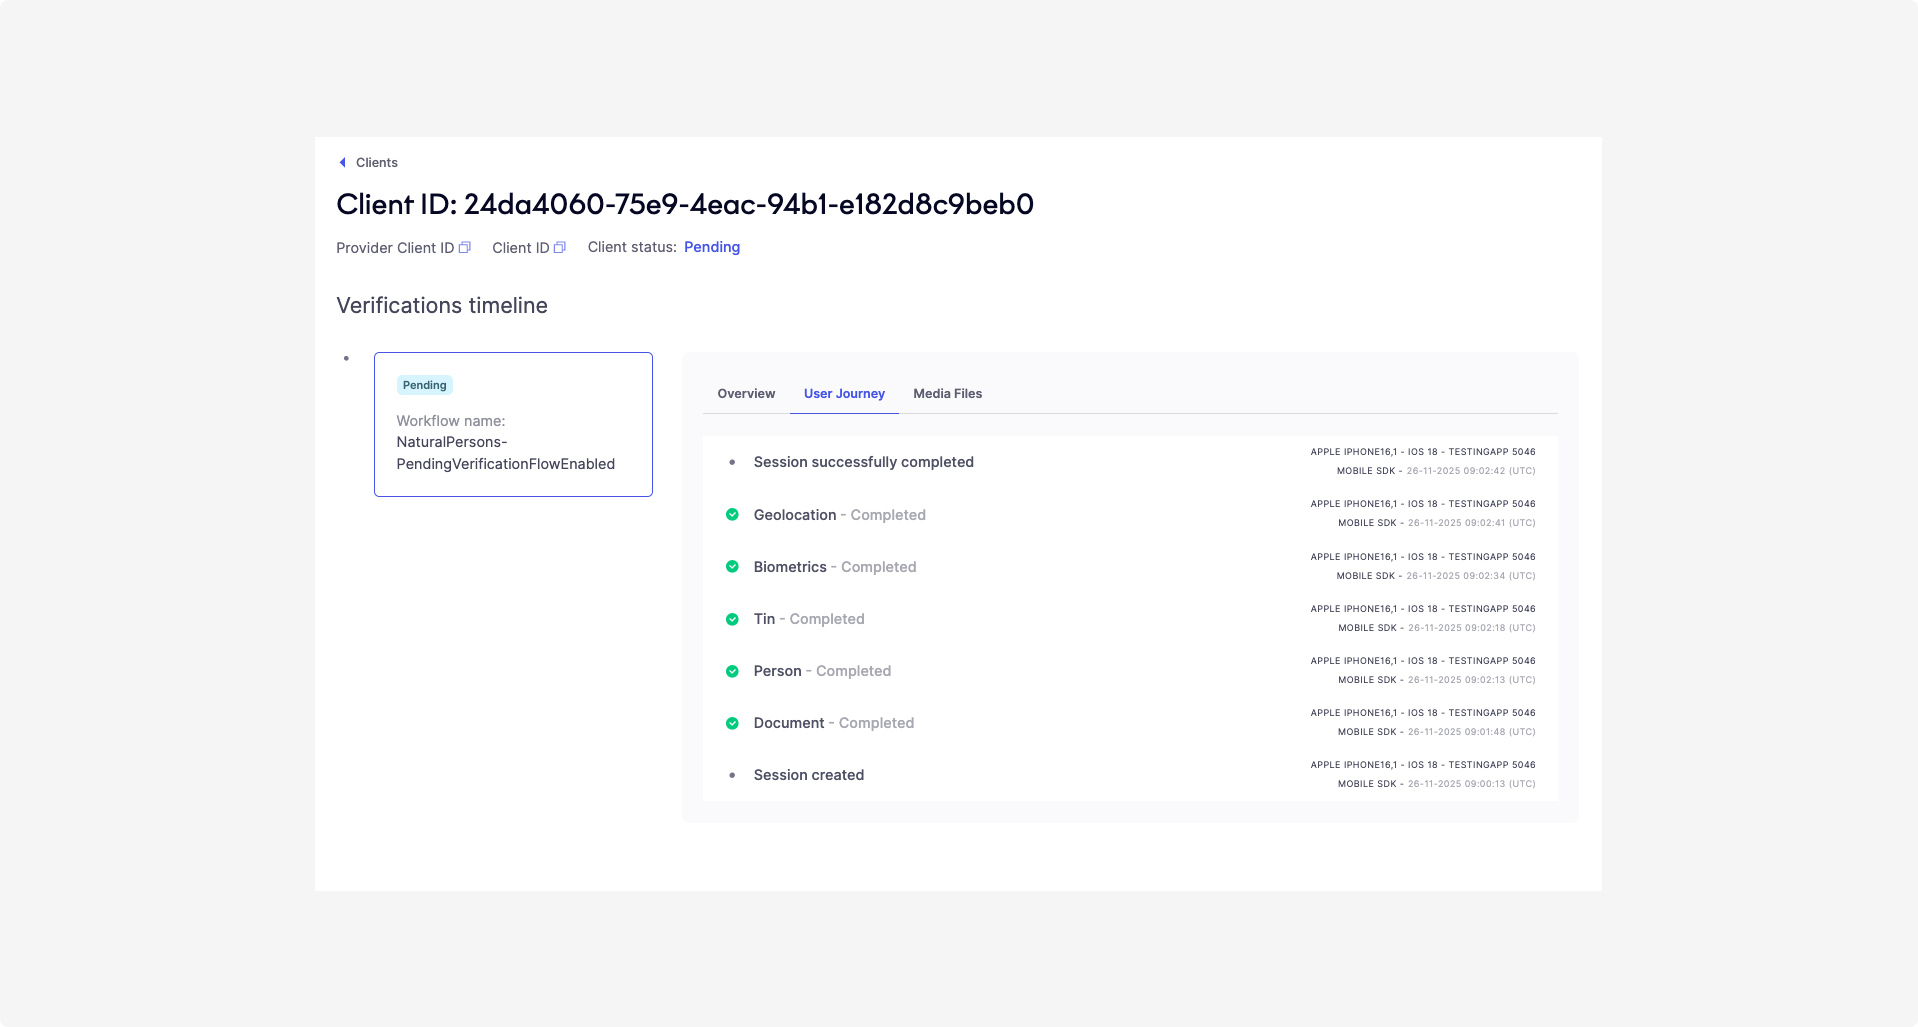
Hub Verification timeline
Available information for each verification includes:
| Field | Description |
|---|---|
| Provider Client ID | Displays your identifier for the client (different from Fourthline’s client_id).Tip: Hover over the value to see the full ID. Use the copy icon to copy it. |
| Client ID | Fourthline’s identifier for the client. Tip: Hover over the value to see the full ID. Use the copy icon to copy it. |
| Client status | Indicates the current stage of the client’s verification journey. Statuses:
|
| Verifications timeline | Lists all verifications linked to the client in chronological order. Each verification card shows:
|
| Overview tab | Displays details when you select a verification card. Includes:
|
| User journey tab | Shows the steps the client completed in the SDK flow, any errors encountered, and whether multiple attempts were required for a specific step. User journey data is available for both the Web SDK and Mobile SDK, for pending and completed cases. It also displays device metadata for each SDK step, including:
|
| Media Files tab | Shows all document images and the selfie uploaded by the client, even while the SDK flow is still in progress. Images remain available in Hub for up to 30 days after the last verification status change and are downsized and watermarked for security. Original, high-resolution images, and images older than 30 days, are available in the Case Review Portal or CDD report after case completion. Tip: Media files are enabled by default in Sandbox and disabled in Production, and are available for all integration methods. To enable them in Production, contact your customer success manager. To view media files, users must have the Identity data access user role. |
Legal details
You can view and update your organization's legal details in Hub. These details appear on CDD reports generated after a verification is completed.
You need the Admin user role to manage legal details.
In Hub, go to Account. You can manage the following fields:
- Legal name
- Address line 1
- Address line 2
- City
- Postal code
- Country
Changes apply automatically to both your Sandbox and Production environments.
Considerations
- Mandatory fields cannot be cleared. After you save a value in a required field, you can change the value but cannot leave the field blank.
- Optional fields can be left blank. For example, Address line 2 does not require a value. Do not use placeholder characters, such as a dash (–), because they appear on CDD reports.
- Legal details are shared across environments. You cannot configure different legal details for your Sandbox and Production environments.
- Legal details are not required to generate CDD reports. If you have not provided them, the corresponding fields in the report are blank.
Next steps
Learn how to use Hub Insights dashboards to your advantage.
Updated 10 days ago