
Identity Verification Integration
Integration Guides
API-only guide
This guide provides step-by-step instructions on how to integrate the European Identity Verification solution via our API.
Before you begin, make sure you have completed the following:
- Identity Verification Setup
- Let your Fourthline delivery manager know if you want the following parameters in the Upload identity data request to be required or optional:
person.nameperson.placeOfBirth
Flow
Click to magnify.
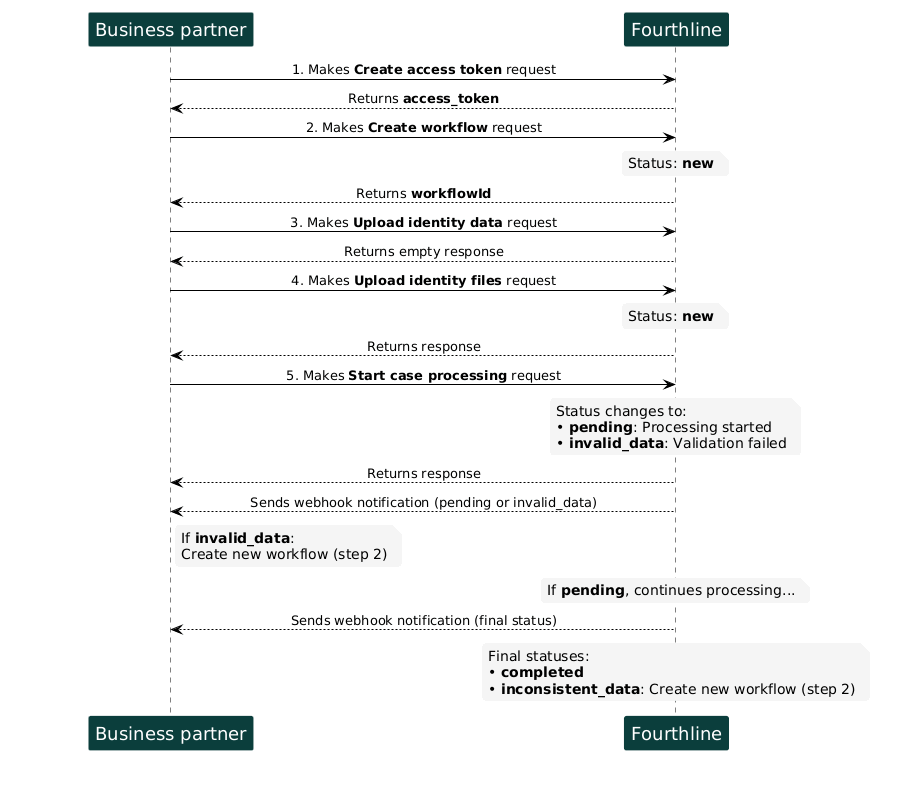
1. Authenticate
Create an access token to authenticate in our API:
- You provide your Fourthline API credentials.
- You receive an
access_token.
Tutorial: Create access tokenAPI Reference: Create access token
Important
For security, access tokens are valid for 1 hour only.
If your token expires, create a new access token by making another Create access token request.
2. Create workflow
Create a European Identity Verification workflow:
- You specify the
workflowNameand provide your unique identifier for the client. - You receive a
workflowIdand a FourthlineclientId.
Tutorial: Create workflowAPI Reference: Create workflow
 Status: The Identity Verification case status changes to
 new.
3. Upload identity data
Upload the client's identity data:
- You provide the
verificationId(same value as theworkflowId). The first request includes theperson,address, andemailAndPhoneobjects. - A successful response is empty.
Tutorial: Upload identity dataAPI Reference: Upload identity data
Tip
To update previously uploaded data, send Upload identity data again with the same
verificationId.
deviceMetaData
deviceMetaDataOn that request, deviceMetaData is merged field by field. person, address, emailAndPhone, tax, profession, and riskRequirements replace the whole object. When you send one of those objects, include every field that should remain stored.
| You send | Stored result |
|---|---|
| A field value | Replaces the stored value for that field |
| Property omitted | Stored value kept |
null | Stored value kept |
"" | Stored when the field accepts that value. A format check rejects "". |
deviceMetaData omitted | Stored deviceMetaData unchanged |
Geolocation
After the SDK or App Component has stored model, update coordinates by sending latitude and longitude only.
Important
Do not send
modelin that request. The SDK or App Component has already uploaded the device model. A value such asChromereplaces the stored model. The Qualified Electronic Signature device-model check then returnsselfie_required.
Stored after the SDK or App Component upload:
{
  "deviceMetaData": {
    "model": "iPhone15,2",
    "language": "nl",
    "latitude": "51.00",
    "longitude": "4.00"
  }
}
Your request that only updates geolocation:
{
  "deviceMetaData": {
    "latitude": "52.37",
    "longitude": "4.89"
  }
}
Stored after that request:
{
  "deviceMetaData": {
    "model": "iPhone15,2",
    "language": "nl",
    "latitude": "52.37",
    "longitude": "4.89"
  }
}
Coordinates are updated. model and language stay, because they were not in the request.
Status: The Identity Verification case status remains new.
4. Upload identity files
Upload the client's identity document and supporting identity files:
- You provide the
verificationId(same value as theworkflowId). - A successful response is empty.
Important
For detailed instructions on how to use this request, see the user guide.
Tutorial: Upload identity filesAPI Reference: Upload identity files
5. Start case processing
Request Fourthline to start case processing:
- You provide the
verificationId. - A successful response is empty.
Tutorial: Start case processingAPI Reference: Start case processing
Status: The case status changes to one of the following and we send the relevant webhook notification:
| Status | Description | Action |
|---|---|---|
pending | The data is valid. | Wait for the next status. |
invalid_data | Invalid or missing data. | Create a new workflow. |
Final statuses:
| Status | Description | Action |
|---|---|---|
inconsistent_data | We found inconsistent data. | Create a new workflow. |
completed | We have processed the case. For our recommendation to accept or reject the client, see the risk code. | Download the CDD Report. |
6. Check case status
When you receive webhook notifications, we recommend also requesting the full case details:
- You provide the
verificationId(same value as theworkflowId). - You receive all the data on the case.
Tutorial: Get case statusAPI Reference: Get case status
7. Download CDD Report
When the case status is completed, download the CDD Report zipfile:
- You provide the
workflowId. - A successful response is empty and the report is downloaded.
Tutorial: Get CDD zipfileAPI Reference: Get CDD zipfile
Updated 18 days ago